High-quality photographs promoting your clothing collection are an integral part of high sales. Most buyers make a purchase decision based on product illustrations. High quality does not always mean high costs. Craftsmanship, equipment, and experience make the difference between an amateur and professional photography. If you have a keen eye for an artist and a tight budget, the following seven-step guide from our experience will help you get great clothes photography. Here is How to Take Pictures of Clothes Without Mannequin – A Step-by-Step Guide
- what is product photography
- how to do product photography
- how to take product photography
- how to shoot product photography
- how much to charge for product photography
Step 1. Photography Product Preparation
The advertised things should look like a brand on photos. The reality is that garments wrinkle, “remember” folds, and look worn after prolonged storage and transportation. Clothing samples suffer from unpresentability the most. Sometimes they have to travel long distances from the production floor to the photo studio, and the samples themselves are not always perfectly stitched.
Preparing clothes for shooting is a significant step that many photographers still neglect in the hope of “ironing out” wrinkles and folds, blemishes, and other visual defects using Photoshop. Could you not follow in their footsteps? The graphics editor is not a magician. It takes time, excellent retouching skills, and experience working in high-risk environments to get a high-quality result with its help.
Shoot your products as prepared for shooting as possible. Use Photoshop to adjust the color transfer and apply the final touches.
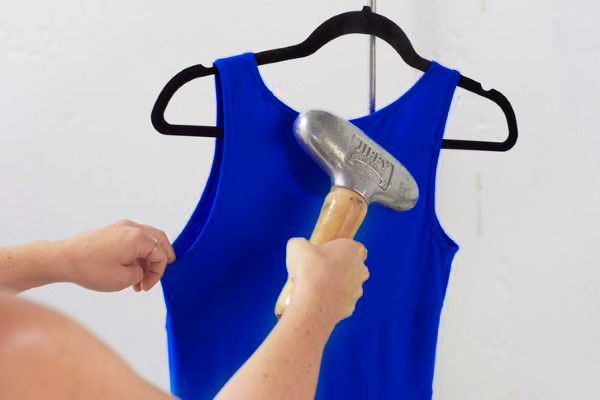
Steam helps to give things their original appearance.
Examine the product to be photographed carefully from top to bottom, outside and inside out. Found stickers, tags, tags, and other identifying signs that need to be removed? Take them away. Are there any creases, dents, or folds on the items after being stored in the package? Iron or steam the product. Repair damage and clean the surface. For example, use a controller – a roller with a sticky surface – or sticky tape to remove dust and lint from the fabric.
Step # 2. Equipment Preparation
Just a few gadgets will help you turn a reasonably spacious room into a photo studio. If you are on a budget, a camera, a tripod, a wide roll of white paper, scotch tape, and natural light are all you need. If your budget is a little more comprehensive, or if you want more room to maneuver, choose where and how to photograph – it is advisable to invest more money in the equipment.
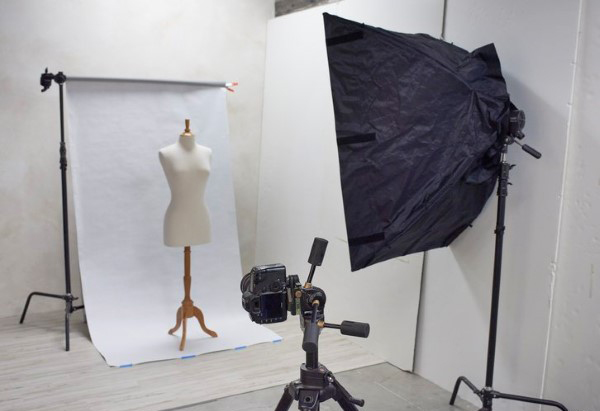
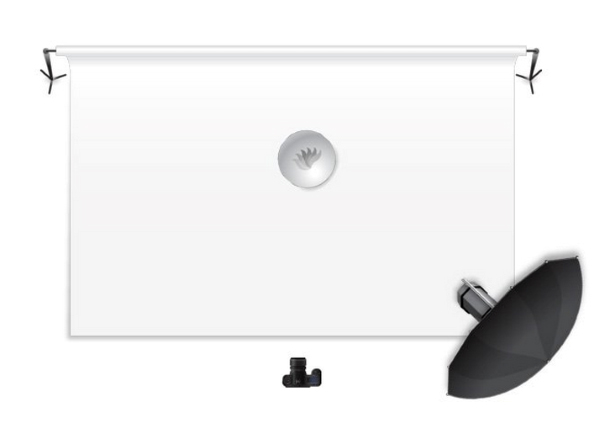
shooting indoor clothing using a camera, tripod, two si-racks, seamless paper cut, a mannequin, and one light source with attachment.
Backdrop
Always use a solid white or light gray background not to distract the viewer’s attention from the depicted subject and avoid problems with the incorrect rendering of colors in the photo. Seamless sheets of paper wrapped in a roll are ideal. They are cheap and are almost always available at most photoshops.
Use a B-stand with a shoulder to attach the heel counter. Pull the paper roll across the floor in front of the camera so that the web takes on a smoothly curved shape. Flatten the paper’s surface, so it stays smooth, free of dents or creases that tend to create stray shadows. Finally, tape the free end of the canvas to the floor.
- Approx. Translator – instead of the B-stand, in English. C – stand, you can use an ordinary studio stand, which is more common in Russia and the CIS countries. Two identical racks without rods are suitable for fixing the background if you put a crossbar made of a hollow metal tube or a plumbing plastic pipe on them. Both can be found in the building materials hypermarket. Pre-drill a hole at each end of the pipe for a standard rack mount.
The barbell shoulder rack is the most flexible solution. You can quickly move around the room and adjust the backdrop’s position relative to the rest of the equipment and objects being shot. If there is no stand, then attach the background to the wall or ceiling with duct tape.
With the background unrolled, place the mannequin or model in the center of the canvas and directly opposite where you will position the camera.
Camera
A camera is an essential piece of equipment for any photography. Just beware of thinking that it is the main element of a successful session. The camera is just a puzzle piece, so it is not advisable to invest the entire budget in it. We suggest you use a DSLR or a very cheap alternative available at your fingertips – your smartphone.
Attach the camera to a tripod. This way, you avoid camera shake – invisible camera shake that can reduce sharpness – and keep the framing consistent across all shots in a series. Plus, it will free up your hands for other tasks.
We suggest not buying an expensive tripod but using at least some. It’s necessary.
Place the tripod with the camera directly in front of the subject to be shot. They will remain stationary for most of the session. If you want to photograph a piece of clothing from the other side, move it relative to the camera.
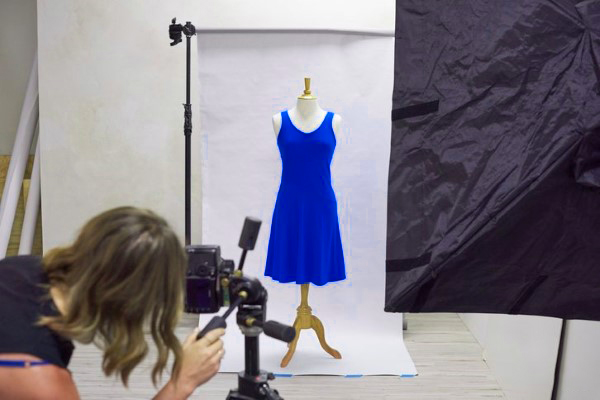
Mount the camera on a tripod directly in front of the subject to be shot.
Light source
Natural light from a window is the most affordable and high-quality lighting in advertising photography of clothing. You have a large window that lets in a lot of light – great! This may be all you need for good lighting. However, if you have the means, we recommend purchasing or renting a basic set of lighting equipment.
With artificial light, you no longer depend on the time of day and weather conditions. The flexibility that artificial lighting provides can dramatically increase shooting productivity and, at the same time, provide uniform lighting from shot to shot. This will make it easier for you to adhere to a certain professional standard.
- Approx. Translator – if you are photographing in a room with sockets, then the battery pack is not required.
By a light source, we mean a monoblock – a pulsed light source used most often in a studio. We will assume that you start with this type of artificial source. The all-in-one is likely to be your single most significant expense, sometimes more than your camera. Therefore, we recommend that you take the time and look for the most suitable device for you from the calculation; it will serve you for a long time.
A softbox is a light-shaping source attachment that scatters light. With it, you can create soft, uniform lighting. Such lighting helps to show the advertised garments in the most attractive way for the buyer.
- Approx. Translator – instead of a softbox, you can use an umbrella “for the light” or “for reflection.” Try to get a large umbrella. The larger the emitting surface area, the softer the illumination created.
The stand holds the light source at the correct height from the floor and at the correct angle to the subject.
The radio synchronization kit consists of a transmitter and a receiver and is used to “link” the camera with pulsed light sources. Thanks to synchronization, the source is triggered the moment you take a photo.
A portable battery pack or battery pack is used for precisely what you think: energizing a source.
Step # 3. Lighting construction
Are you photographing with natural light? Position the subject near the window so that it is evenly lit. If you are using a candy bar, then install it following the diagram below (top view):
Position the source at an angle of 45 degrees to the camera-to-subject line.
Place the light source with a softbox or umbrella mounted on it under a hum of 45 degrees to the subject. Strive for soft lighting that is uniform over the entire area of the product.
Let the camera be positioned directly in front of the subject being photographed. If it is too close to the backdrop, unwanted shadows may appear in the background. If they do, move the subject away from the backdrop – the background will remain uniformly white.
Set the power of the artificial light source to half of its maximum power.
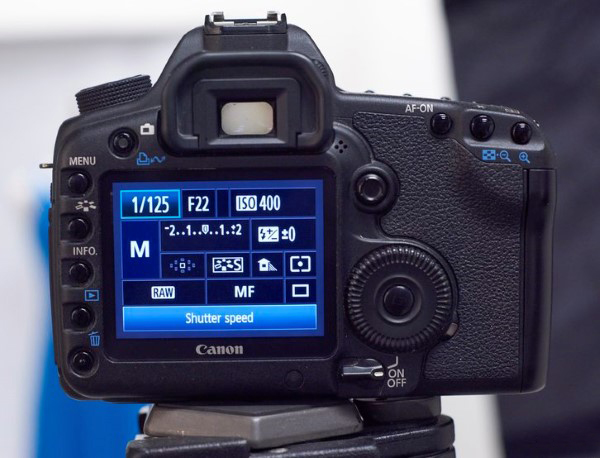
To flexibly adjust the exposure – the “lightness” of the picture – we recommend switching the camera to the manual shooting mode (“M”). If you are photographing in natural light, then to assess the exposure, be guided by the readings of the exposure meter built into the camera.
- Approx. An interpreter is a device that measures the amount of light that has entered the lens.
The exposure meter is displayed in the viewfinder. Choose the shutter speed, aperture value, and ISO sensitivity in the camera; make sure that the mark points to the number “0”. In this case, you will get a standard “lightness” picture.
- Approx. Translator – if the object being shot is light, or it occupies a small area in the frame, then the correct exposure – a photo standard in terms of “lightness” – is obtained when the exposure meter points to “plus,” for example, +0.3, +0.7, +1. You can learn more about manual shooting and working with the built-in exposure meter in the article “Fundamentals of photography # 4.11”. Shutter speed, aperture value, and exposure, if necessary, meet in the article “Fundamentals of photos # 1”.
If you use a pulsed light source, the camera’s built-in exposure meter will not be helpful. Use a handheld exposure meter. With it, you can easily, quickly, and accurately measure the light intensity. Place it directly next to the subject to be shot and make sure the unit synchronizes with the flash. This will give you an accurate reading.
If you cannot use a manual exposure meter, judge the “lightness” on test shots. Select 1/200 second, 11, and 100 as the initial values for shutter speed, aperture value, and ISO sensitivity, respectively.
If you are photographing with pulsed light sources, give them time to recharge. The light source may not fire on time if you do them quickly, one by one. The recycling speed depends on the current flash output and battery capacity.
Step # 4. Layout design on a mannequin or model
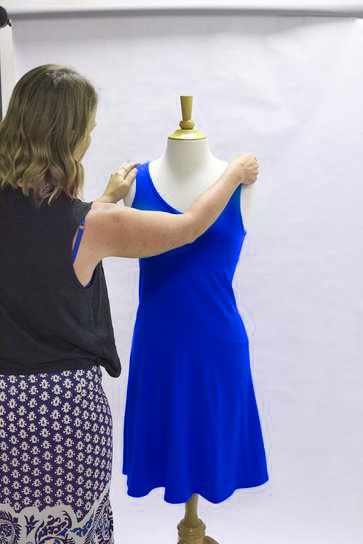
Shooting clothes on a mannequin or model is the best way to showcase the style and fit. In addition, you help the potential buyer imagine how the item will sit on him.
Take the time to style to show off the strengths of a particular garment clearly.
Models breathe life into the advertised product. The problem is that professional models are costly. Mannequins are an affordable alternative that is also easier to work with.
Take the time to shape the product you are photographing. If the item looks large on a mannequin, use pins, clothespins, or other means to tighten and curl the fabric. Let the garment fit the mannequin.
At the processing stage, you can create the effect of an “invisible” model.
If you think that the dummy will distract a potential buyer’s attention from the advertised item of clothing or give the latter the look of a cheap item, then use Photoshop to create the effect of an “invisible” model. You will need several additional shots of the same product to combine them in the editor then and create, thereby, a volumetric imitation that demonstrates the style and fit of the thing.
Step # 5. Camera setup
If you have chosen the wrong shooting parameters, no level of Photoshop proficiency will help your photos look professional. Ensure you understand things like ISO sensitivity, shutter speed, aperture value, and white balance before shooting.
Pay particular attention to ISO sensitivity, aperture value, and white balance.
ISO sensitivity
Make sure it is no more than 600-640 ISO. With high values, digital noise will appear: the picture will acquire “grain.” Grayish or colored spots will give your photos a cinematic look.
The higher the ISO sensitivity, the more the digital noise appears.
- Approx. Translator – in addition to digital noise, as the ISO sensitivity increases, the dynamic range of the camera narrows. What is it? Read the article “Photography Fundamentals # 4.4”.
Also, if the ISO sensitivity is high, the camera “blurs” the details of the image, their clarity decreases.
The tripod allows you to shoot with ISO sensitivity equal to 100 or 200. The image quality, in this case, remains the highest.
Aperture value
It affects the “blur” of the foreground and background. The larger the aperture value, the less the background is “washed out,” and the more details of the subject are depicted in the photograph. Set the value to 11 or higher to depict the entire subject in sharpness.
- Approx. Translation – learn in detail how the aperture affects the depth of field of the article “Fundamentals of photos # 3”.
White balance
Have you ever seen a photograph that looks like you are looking at it through orange or blue glass? The most likely cause of the overall color cast is an incorrect white balance.
Light sources differ in color temperature. Incandescent lamps, LED lamps, sunlight, and so on can have different color temperatures. Therefore, the camera can reproduce colors in a filmed scene illuminated by a particular light source differently from what you see with your own eyes. In particular, the camera does not “know” what white is. White balance helps the camera “perceive” colors the way a person does.
You can specify the type of light source explicitly or choose the “automatic white balance” (“AWB”) setting and thus let the camera determine the color temperature on its own. Whichever you choose, pay attention to white balance. Otherwise, you will have to restore the correct colors using Photoshop.
- Approx. Translation – if you shoot with the flashlight, then install the software “Flash» ( « the Flash »). Or be prepared to make color adjustments during the processing phase. This is easiest to do if there is a gray-colored subject in the frame, such as a white background or grayscale map, and you are photographing in RAW format. For example, fine-tuning the white balance, see the article “Adjusting the White Balance Neatly.”
Step # 6. Filming
Finally, the moment you’ve been waiting for! Aim the camera lens at the subject to be photographed and press the shutter button halfway down. Give the camera some time to focus. Then press the button to take a photo.
Change the shooting parameters of the camera if the light intensity decreases or increases.
- Approx. Translator – if you use natural light or artificial sources of constant light, then change the exposure or power of the sources. It would be best if you mounted the camera on a tripod. If using pulsed light sources, then change their power.
The more “shooting hours” you have, the better you will feel what and when to adjust.
Take pictures of everything from different angles.
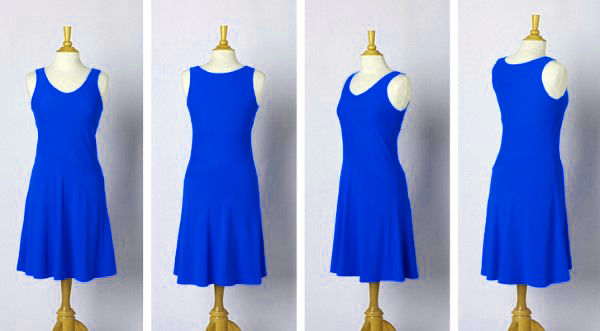
Take as many pictures as possible. You will most likely want the face and back views, 45-degree views, and side views. Plus photos of individual details. The more species, the better. First, you have a lot to choose from. Secondly, the more visual information you present to a potential buyer, the higher the likelihood of a purchase. It is easier for the client to decide when he can “turn” the product and look at it from different angles. Now move next How to Take Pictures of Clothes Without Mannequin – A Step-by-Step Guide
Step # 7. Treatment
After shooting, it’s time to start preparing photos for publication. The main task of processing is to create the most attractive image for the buyer with the least amount of time.
The most straightforward and most beneficial solution is to delegate processing. Digital photographs can be easily and quickly transferred anywhere globally, and it is just as easy to get the final images.
If you process photos yourself, you should align the product relative to the frame, crop, remove and replace the background, and color correct. This will give you a homogeneous series of illustrations that will do their job well – increase sales.
Develop and write down a standard sequence of actions to apply to each shot. This will ensure uniformity. You can create your standard not only for processing but also for shooting.
Alignment
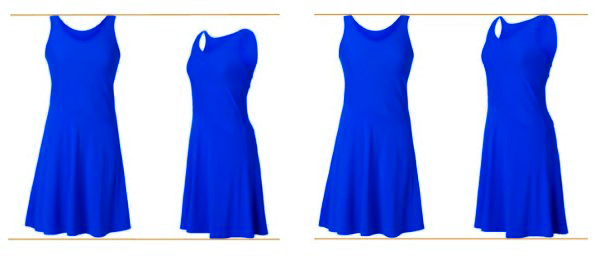
Make sure the garments in each photo are at the same scale and centered on the photo. To neatly align photos of the same product, use guidelines in Photoshop. For example, please create a new Photoshop document and add guides to it. Use this document to align all images.
Perfectly zoomed and centered product photos look beautiful to the customer.
Cropping
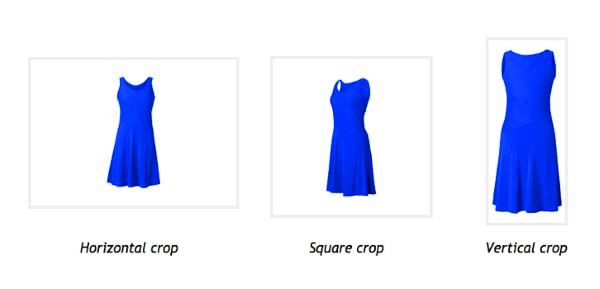
How to Take Pictures of Clothes Without Mannequin – A Step-by-Step Guide about cropping
Similar to alignment, cropping should be the same for all products. This will make it easier for potential buyers to see the illustrations in the online catalog.
If you are using alignment guides, it is easy to crop your photos according to the technical requirements of the online store.
The left photo is cropping horizontally, the center photo is cropping square, and the right photo is cropping vertically.
Background
We use a white background, as we recommend ourselves, and as required by some significant marketplaces. You can go further: remove the background and, thus, completely get rid of possible visual defects on it.
The absence of background, in fact, a “transparent” background, expands the possibilities of their use on websites and reduces the time they download from the Internet. This is How to Take Pictures of Clothes Without Mannequin – A Step-by-Step Guide
Color
Even if the white balance is correct, some colors, such as bright red or pink, may not be accurately perceived by the camera. Therefore, you should correct the color rendition with Photoshop.
If the color of the thing depicted in the Internet catalog differs from the color, in reality, the buyer will not be happy with the “deception.” Therefore, make sure that the colors in the photo match what you see directly with your eyes. The key idea here is that the customer wants to see exactly what he ordered in his hands.
There are several ways to color correct in Photoshop. You should find out about them and choose the one that suits you best.
After working with color, make sure sRGB is selected as the color space (color profile) of each final image. Then the colors, what you have been working on for a long time and painstakingly. It will be displayed in all browsers and on all computers approximately the same. it’s all about How to Take Pictures of Clothes Without Mannequin – A Step-by-Step Guide
Experience is the Best Product Photography
Advertising photography of clothes is not an easy thing. Performing the complete cycle yourself is not an easy task. If something does not work out perfectly, then try to take the “imperfections” calmly. Your task is to improve the result and increase the efficiency of the process with each shooting. The better the illustrations of the advertised products, the higher the sales and the more people will get what they want.
Rely on our recommendations, and you will receive a result that you will be proud of. Let’s remember them. Prepare clothing items for shooting, organize the shooting space, build lighting, set up the camera, take pictures of things, bring pictures to “full readiness” at the stage of processing. Serve slightly chilled! it’s all about How to Take Pictures of Clothes Without Mannequin – A Step-by-Step Guide
How to Take Pictures of Clothes Without Mannequin Video Example
- how to take pictures of clothes without mannequin
- how to display clothes without a mannequin
- how to photograph clothes without mannequin
- take pictures of clothes without mannequin
- how to take pictures of clothes without mannequin ebay
BEST GHOST MANNEQUIN PHOTO EDITING SERVICES
Ghost Mannequin service, improve product image quality and scale-up online apparel business Get Free Trial For various catalogs and e-commerce sites, mannequins are used instead of a human figure to create the 3D effect of various garment items like shirts, trousers, jacket, cardigan, swimsuits, lingerie, etc. and often pieces of jewelry. But, in the final output, you need to remove the background along with the dummy and give it a hollow or ghostly look.
That’s why it’s called the Ghost Mannequin Effect, also known as the Invisible Mannequin Effect. You can create the same effect by using Transparent Mannequins or Removable Ghost Mannequins. But, after shooting the photo, you may need photo editing services to create the effect perfectly. That’s why, to reduce time and money, many photographers avoid expensive Transparent Mannequins or Removable Ghost Mannequins because photo editing is more cost-effective. To get a 3D effect, shoot the normal mannequins wearing garment items from various angles. At the same time, shoot the neck, bottom, inner parts, and sleeves separately and send it to us.
[twenty20 img1=”6082″ img2=”6083″ offset=”0.5″ before=”Before ” after=”After “]
We’ll remove the mannequin and studio background from the photo and replace the other parts in Photoshop to create a hollow-human or ghostly effect. Even if you don’t have shots for other inner parts, we can manage to provide you with the final output. In addition to our Mannequin Removal Service, we’ll also remove bad wrinkles, dust, spots, and dumps. Also, to optimize the product for final output, we’ll apply cropping, resizing, straightening, shadow removing, and reshaping.
it’s all about How to Take Pictures of Clothes Without Mannequin – A Step-by-Step Guide